Quality compressed PDFs in Mac OS X Lion

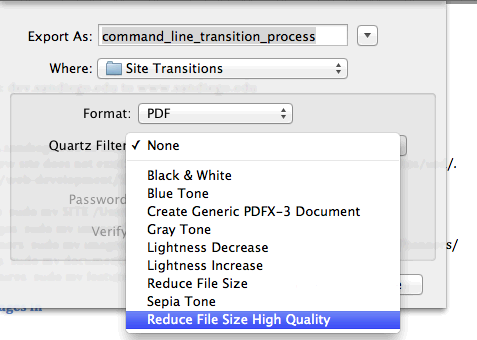
Save As… has been renamed to Export in Lion’s Preview.
I’ve verified that these instructions for using Preview to compress PDFs continue to work in Mac OS X Lion.
One minor problem is that the last paragraph—that you can even “filter while printing” without using Preview is no longer true, but it wasn’t true in Snow Leopard either. I can’t remember if it worked in Leopard or if it last worked in Tiger.
I took some screenshots but haven’t included them here; they really are exactly the same as when I wrote those instructions. The only real difference is that in Lion, “Save As…” has been renamed “Export…”.
The main issue, as Vinnie pointed out in the comments is that after you create the filter it doesn’t automatically show up in Preview’s list of Quartz filters. Either ColorSync or Preview is working from the wrong folder.
ColorSync saves your filters in your personal “Filters” folder under your “Library”. But Preview looks in “PDF Services” for the filters. Copy or move the new filter from your Library’s “Filters” folder to your Library’s “PDF Services” folder. If you want to make the filter available to everyone who uses your Mac, put it in the main “/Library/PDF Services” folder instead. Note that Lion has hidden the Library folder, so you’ll need to use the “Go” menu and “Go to folder…” to go to your “Library” folder, and also to go to the “/Library”, depending on whether you are making it available for yourself or for everyone.
Further note that Preview in Lion, but not Snow Leopard, (sometimes? always?) has problems finding Quartz filters inside your own PDF Services folder, so you may have to always put it in the main Library’s PDF Services folder instead. Oddly, the Print dialog doesn’t have any problem with this, only Preview.
This will work in Snow Leopard as well—and will sort of bring back the ability to use the filter directly while printing to PDF. The filters will be available under the PDF menu; on choosing a Quartz filter, it will immediately save the current document as a PDF. The Mac doesn’t seem to ask for a filename, and just deposits it on the Desktop, though some of that may have to do with settings on my computer.
In response to Quality reduced file size in Mac OS X Preview: You can use Quartz filters to reduce the size of your PDFs in Mac OS X while maintaining a high image quality.
More macOS Preview
- AppleScript Preview in Snow Leopard and Lion
- Preview supports AppleScript, but the support is turned off by default. You can enable it with three terminal commands.
- Quality reduced file size in Mac OS X Preview
- You can use Quartz filters to reduce the size of your PDFs in Mac OS X while maintaining a high image quality.
More macOS tricks
- 42 Astoundingly Useful Scripts and Automations for the Macintosh
- MacOS uses Perl, Python, AppleScript, and Automator and you can write scripts in all of these. Build a talking alarm. Roll dice. Preflight your social media comments. Play music and create ASCII art. Get your retro on and bring your Macintosh into the world of tomorrow with 42 Astoundingly Useful Scripts and Automations for the Macintosh!
- Save clipboard text to the current folder
- Use the Finder toolbar to save text on the current clipboard directly to a file in the folder that Finder window is displaying.
- Avoiding lockFocus when drawing images in Swift on macOS
- Apple’s recommendation is to avoid lockFocus if you’re not creating images directly for the screen. Here are some examples from my own Swift scripts. You can use this to draw text into an image, and to resize images.
- What app keeps stealing focus?
- I’ve been having a problem on Mac OS X with something stealing focus. Here’s how to at least find out what that something is.
- Enable AirPrint for all connected Mac printers
- I have an iPad and an old workhorse of a printer, an HP 1012 LaserJet, connected to my iMac. I almost never need to print from the iPad, but when I do, handyPrint works.
- 14 more pages with the topic macOS tricks, and other related pages
More PDF
- Creating searchable PDFs in Ventura
- My searchablePDF script’s behavior changed strangely after upgrading to Ventura. All of the pages are generated at extremely low quality. This can be fixed by generating a JPEG representation before generating the PDF pages.
- Create searchable PDFs in Swift
- This Swift script will take a series of image scans, OCR them, and turn them into a PDF file with a simple table of contents and searchable content—with the original images as the visually readable content.
- Calculating true three-fold PDF in Python
- Calculating a true three-fold PDF requires determining exactly where the folds should occur.
- Adding links to PDF in Python
- It is very easy to add links to PDF documents using reportlab or platypus in Python.
- Multiple column PDF generation in Python
- You can use ReportLab’s Platypus to generate multi-column PDFs in Snakelets, Django, or any Python app.
- Four more pages with the topic PDF, and other related pages

In Lion, if you MOVE (vs. copy) the filters, then you can't delete them from Colorsync Utility. Found out the hard way. I'd recommend copying them.
Matt Heinrich at 2:11 p.m. March 1st, 2012
UlWWW
I tried it and for me the new filter does not appear in the window Export under Quartz Filter.So what I had to do is open the ColorSync Utility and from there to apply the new filter. Any ideas why this might happen?
Radka Ya. in Denmark at 7:53 a.m. March 5th, 2012
uTMwo
If you’re using Lion, make sure you put it in the main /Library/PDF Services folder. If it doesn’t show up when you put the filter there, no, no idea why it isn’t showing.
Jerry Stratton in San Diego at midnight March 26th, 2012
+g/Ql
Hi. I can't seem to find a "Filters" folder in Lion. I have found both PDF Services folders.
Todd at 9:51 a.m. April 5th, 2012
8me7L
On the Lion computers I used for testing, the “Filters” folder was in the Library folder under your home directory (so that if your username is “Todd” on your computer, it would be in /Users/todd/Library/Filters).
Jerry in San Diego at 10:13 a.m. April 5th, 2012
3eqBR
i can't find the filters folder either. not in users library or main library. Any ideas?
Jon Cooper at 1:40 p.m. April 8th, 2012
aJ+kK
Have you been able to find where ColorSync saves the files? If not, try using Spotlight to find them.
Jerry Stratton in San Diego at 9:21 p.m. April 8th, 2012
+g/Ql
Hello,
Thank you for making this tutorial. I can't believe resizing a pdf involves all these steps! I am using snow leopard and these directions work for me perfectly.
I am having one issue however- The new size is not consistent for each pdf I resize. I created a 3 page PDF that resized to 840 KB and another 2 page PDF that resized to 2.7 MB. Why the difference?
I am resizing them using the same colorsync option that I created under your instructions. If the size is based upon the number of pages this isn't going to be a viable option for me. The PDF's I am resizing are Flyers that I have made for my company and they are all a different # of pages and all contain different content.
Thanks for your help.
jane at 1:26 p.m. May 7th, 2012
+TfZI
Hey, jane. Sizes won’t be relative directly to the number of pages if they have images in them. The complexity of the images in a document will swamp any effect the number of pages has (except insofar as more pages means more opportunity for complex images).
Most likely the difference between your 840kb PDF and your 2.7mb PDF is the number and/or complexity of the images.
It could also be the dimensions of the images: sometimes if you put in camera originals rather than reduced-size versions, the size of the end document will explode. This is because the file size of an image is proportional to the square of the dimensions. That is, a 4,000 by 2,000 pixel image is sixteen times larger than a 1,000 by 500 pixel image.
4,000*2,000: 8,000,000 pixels
1,000*500: 500,000 pixels
You don’t need to manually adjust the size of the image; use the Image Sampling option in ColorSync to set a maximum dimension (I think it’s a maximum height) and ColorSync will re-dimension the images for you when necessary. Over on the parent page, Dotty recommends a maximum of 1026 pixels, but you can play around with it to see what works best for you.
Jerry in San Diego at 10:32 a.m. May 10th, 2012
3eqBR
Hi there,
I can find the filters folder in the library however I can't find the PDF Services folder that I need to move my newly created filter to....
Jade in South Africa at 8:12 a.m. June 13th, 2012
XGT4F
Jade, sometimes you have to create Library folders the first time you put something in them.
Jerry in Hesperia at 10:35 a.m. June 13th, 2012
eIrSj
Mac OSX Mountain Lion:
After the filter is created in Colorsync, go to "Users/'Username'/Library/Filters/",
copy the new filter in there to "System/Library/Filters/"
Done!
Hope it help.
Ken in Earth at 9:40 a.m. August 31st, 2012
+IP1o
Thanks. I have found a problem with saving PDF from docx files, it generate huge PDF that its size cannot be reduced with your filter (7 pages in 10Mb, all text). Saving all the content in doc format before saving it as PDF significantly reduce the file size to few hundred KB even without applying your filter. I have tried searching the internet for the cause of it to no avail.
Frank in HK at 8:59 a.m. October 10th, 2012
wpowZ
This worked for me for a single page but how do I alter a multi page pdf file size? When I tried, it just converted the front page of the document to a reduced file size.
Thanks
Jackie in UK at 10:32 a.m. October 10th, 2012
2yqnR
Jackie in UK, I have never seen that happen unless saving as a PNG or some other image. Are you sure you have it set to save as PDF?
Jerry Stratton in San Diego at 10:53 a.m. October 10th, 2012
3eqBR
For those of you who can't find the user/library folder, I have finally found a way to get to it:
Go to your user folder (as explained above)
If you can't see the "Library" folder, click on the "Go" menu at the top.
Towards the bottom of the menu, click on "Go To Folder..."
type in "library" and hit enter.
The User/Library folder will appear!
Thanks for the post and all the helpful comments. This is quite convoluted but it did the job!
Mor in New York at 8:31 p.m. October 17th, 2012
E361s
Mac OSX Mountain Lion (10.8.2):
After the filter is created in Colorsync, open FINDER and pull down the GO menu.
Select Go To Folder and type /Users/YOURUSERNAME/Library/Filters/ (using your username)
Right click, copy the filter you created in Colorsync and then use Go To Folder and type /System/Library/Filters/
Paste the filter you copied there
Export again from Preview should show the new filter
fleshed out a bit from Ken below - thanks Ken.
Snapster in texas at 10:11 a.m. November 21st, 2012
gXtUW